Making Your First Guitar
A Tutorial
Finishing
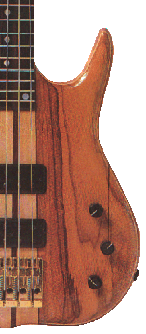
The first consideration after getting the instrument to the shape you want is to sand it so that it is smooth to the touch. Take your time here as a poor sanding job cannot be hidden with the finish, but will only make it stand out. You may have to use paper as coarse as 60 grit to remove rasp marks, otherwise, skip to about 80 grit. You can use power sanders, but as you are trying to remove scratches, start sanding along with the grain at this point. Don't use circular sanders or belt sanders across the grain. This is most importanat when staining and using a clear finish. You might use a belt sander to make the first sanding and then progress on to a felt block and hand sanding, or and inline palm sander. Circular sanders should be of the "random orbit" variety, which don't go repeat the same circular pattern over and over, but, rather randomly move to reduce visible sanding marks in the wood surface. Progress to 100, 120, 180, 240 and possibly 320 grit. Any finer and the polished nature of the wood might impede proper adhesion of the finish to the wood itself. Dust the surface off with an air compressor, vacuum it off and/or use a tack rag which is a commercially available "sticky" rag which lifts up any particles and removes them from the surface.
Filling
In porous woods, it would probably be desirable to fill the pores with material so that when the finish is applied, you get a smooth finish and the surface is not "pock marked" where the pores exit the surface plane of the wood. Pore fillers are commercially available and can be either water or oil based. I would choose the one that is closest to the finish I intend to use. This would minimize any antagonistic reactions between the two where they meet. Pore fillers are generally spread onto the wood using some flexible applicator such as an old expired credit card or plastic spatula. The idea is to go across the grain and force the material into all the pores and crevices. Lightly scrape off any excess, but leave a haze covering the wood. When this has dried and cured, sand the reaminder off with a fine, non-loading sandpaper. For very porous woods, this may have to be repeated. Other woods, such as maple, have a close grain with unpronounced pores and may not need any filler.
Sealer or Wash Coat
The sealer or wash coat has two purposes. One being to penetrate the wood, particularly end grain allowing the finish to penetrate evenly and not give a blotchy appearance, once again more important in transparent finishes. It also provides a surface for the final finish to actually "bite into" and form a better bond with the instrument. One coat should suffice. Sand lightly with a fine grit paper between all applications to level off any imperfections such as bubbles and to once again provide microsocpic scratches for the finish to bite into.
Finish Coat
If you want to bring out the natural beauty of the wood you have chosen, you may want to go with an oil finish, such as tung oil. This finish penetrates the surface of the wood and with added metalic hardeners, cures to a hard, non-tacky finish. With several applications, the finish can be buffed out and a wax can be applied for protection. The finish has a very warm look to it and is easily repaired if damaged. The oil and wax finishes usually are more satiny looking and won't take a very high gloss shine.
Natural beauty can also be brought out using synthetic finishes such as Nitrocellulose® lacquer, acrylic lacquer, urethanes, as well as water based finishes such as Hydrocote® and Crystalac®. Nitrocellulose® is the traditional finish on many musical instruments. It has a high solid content in that it builds well. This means that you can get a rather deep looking "shell" around the instrument, just like a Smarties® candy. Nitrocellulose® buffs out to one of the clearest shines and can look like glass. It is availabe in gloss and satin. It can be tinted to make it translucent or opaque, or left clear. Disadvantages are that it is highly fammable, so it must be applied in a well-ventilated area with spark proof fans and fixtures. It is toxic, so a chemical cartridge respirator must be used for those not wishing to get high. Nitrocellulose® is rather brittle, as well, and can chip and even get stress fractures in it with temperature changes. This can be viewed as the "charm" of a vintage finish and is not necessarily bad or unappealing. Finally, because of its toxicity, many states and provinces are regulating its sale so that it is no longer available to the hobbiest. Acrylic lacquers are popular amonst many manufacturers, but can be more difficult and messy to use. They require a catalyst to cure and so this introduces you one more variable to contend with. Acrylic lacquers are durable. Urethanes are somewhat softer, but are readily available and easy to use.
Water Based Finishes
The new water based finishes are gaining popularity for musical instruments as they are non-toxic, non-flammable and clean up easily with just soap and water. Being water based, the first coats can tend to raise the grain a bit, so a good sanding and dusting is advised. Two popular water based finishes are Hydrocote® and Crystalac®. Crystalac® is formlating a finish specifically for musical instruments and can be obtained through Stewart MacDonald's Guitar Supply Shop. These water based finishes dry quickly and build rapidly. They sand and rub out nicely (more on this shortly).
Application
For an oil based finish, a plain brush or clean cloth will suffice. For the lacquers or water based finishes, I prefer spraying. Spraying, once you get the hang of your equipment and the peculiarities of the finish you are using, gives nice, smooth, even coats. With nitrocellulose, which dries extremely rapidly, this is really the only practical method. Others can be applied with a foar or bristle brush, taking care not to have drips, runs, loose bristles and settling dust particles ruin your work. Follow the manufacturer's directions for the proper application and numbers of coats. Sand between each coat to level any pinpoint bubbles, dust particles and to give a better surface for the subsequent coat to bite into.
Gassing Out
After you have aplied your final coat of finish, allow the instrument to sit for several days or even weeks, allowing it to gas out. Solvent is still trapped inside the lacquer and it will be released over time. If you can still smell the finish, you should let it sit and cure a bit longer. Once gassed out and cured, you can progress to rubbing out the finish.
Rubbing Out
Even with the greatest care and under the best conditions, an applied finish is usually not flawless. Once through spraying your project, and depending on the finish used, you may want to "rub" it out. This is also where the term hand rubbed comes from. The idea is that by scratching up the surface you can actually bring up a shine! Putting successively finer and finer scratches on the surface should achieve an end result where there are so many fine microscopic scratches in every which direction that any portion of the surface resembles the facets of a diamond and will reflect light off in all directions. This gives the appearance of a very shiny surface.
After having sprayed and cured your guitar, have a look using oblique lighting and you'll see minor imperfections, pinpoint bubbles or dust particles. Depending on how much improvement is needed, you may want to use some very fine grit sandpapers or just go to pumice or rottenstone, or perhaps some other rubbing compounds to bring out the finish. More substantial imperfections such as runs, drips or "fish eyes" may need levelling with fine sand papers starting around 400 to 600 and working upwards to finer grades, up to 2000 grit. Another fine product is 3M's MicroMesh® kit which contains an assortment of grits fine enough to be used to take the scratches out of helicopter bubbles. Usually, this is done with some sort of lubricant. I prefer lukewarm water with just a touch of Murphy's Oil Soap in it. It lubricates the sanding action and washes out the removed particles.
It is very important that the surface be cured when rubbing out. Soft, uncured surfaces may allow the finish to "ball up" when rubbed and come off without imparting the desired shine. Don't rush the job at this point. Some finishes dry harder than others and, therefore, can be rubbed out more efficiently or to a higher gloss than others. Nitrocellulose® lacquer brings rubs out to one of the most dazzling shines. Because you are removing some material in the levelling and rubbing out process, make sure you start with an adequate thickness of finish and be particularly careful on the edges, particularly "hard" 90 degree edges where you may have a tendency to cut right through to the wood if not careful.
Instrument manufacturers generally use large cloth or lambswool wheels on which dry polishing compounds can be loaded and this reduces the amount of time needed to get the glossy finish. Under power, it is even more easy to burn through the finish, so be cautious.
For the casual guitar maker, consider approaching a local woodworking or cabinetry shop or even an automotive painting shop (e.g., Maaco) and see if someone there might be able to spray your project for you. You just might be able to swing some custom metalflake finish for the price of a case of beer.
Tip: Cyanoacrylic glue (Krazy Glue®) makes a quick fill for small defects in a nitrocellulose finish.
If desired, a wax can be applied over the final finish for added protection and shine. When working with musical instruments, stay away from any product that has silicones in it as these will be all but impossible to remove and may present a headache to someone trying to refinish the instrument in the future. Silicone causes fish eyes which are round voids left in the lacquer as the silicone tries to repel the finish.