![]()
FIGURE 1 (1)
passes the ball to either (2) or (3) - here (3). (2)
pops out to the wing using (4)'s screen. (3)
pops out to the wing using (5)'s screen and
receives a pass from (1). (4)
sets a screen for (2). (5)
sets a screen for (3).
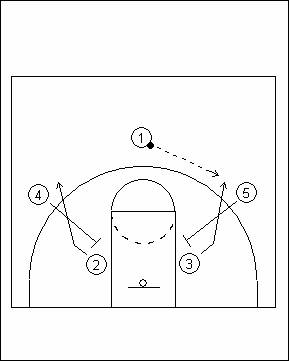
FIGURE 2 (1)
screens away for (2). (2)
flashes to the high post using (1)'s screen, then
pops out to the point. (3)
holds the ball and looks for a pass to either (4) or
(2). (4)
cuts to the ballside low
post using (5)'s screen. (5)
screens away for (4).

FIGURE 3 (1)
receives a pass form (2), then looks to pass to
either (3) or (4). (2)
screens away for (3). (3)
flashes to the high post using (2)'s screen, then
pops out to the point. (4)
screens away for (5). (5)
cuts to the ballside low
post using (4)'s screen. …AND IT CONTINUES UNTIL A GOOD
SCORING OPPORTUNITY OCCURS…
